

Students can print documents using the standard Windows operating system when they are using one of FGV’s computers, installed in laboratories, libraries, study rooms, etc.
This option gives students another way to execute Step 1, to create a Print Job. However, Step 2, to confirm the operation, must take place using PaperCut, always in the same manner.
This option is only available on FGV’s computers, because the PaperCut printer software is only installed on them.
STEP 1 – Create Print Job
When using a program installed on one of FGV’s computers (Microsoft Word, in this example), perform the following actions:
• Activate the Print command in the program and open a Print window;
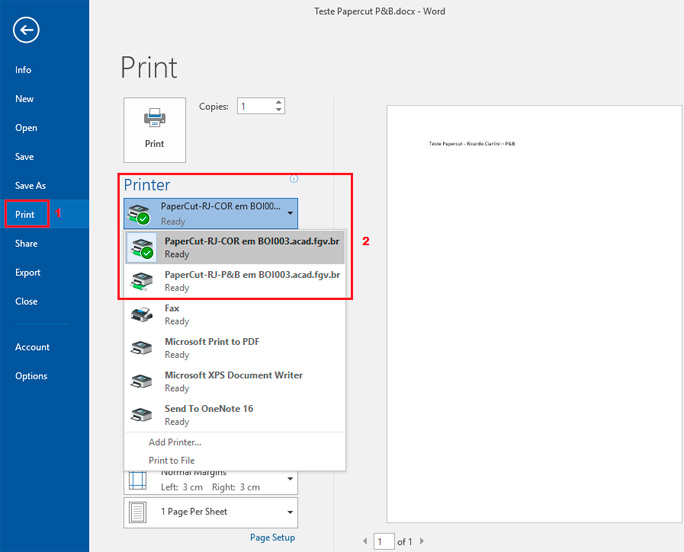
• Choose your options, such as the number of copies and the pages you wish to print;
• Select the printer to be used, choosing one whose name starts with PaperCut;
• Click the Print button.
By following this procedure, you will be executing Step 1 of the printing process, creating a Print Job and placing it in a queue, pending Step 2.
One of the advantages of using this option is the possibility of printing any content involving a software program installed on FGV’s computers. For example, a graphic generated by Statistical Analysis Software (SAS) can be printed through this option, while this is not possible when executing Step 1 through PaperCut.
You should execute this step when you are near one of the PaperCut printers. You can use your own personal device or an FGV computer exclusively dedicated to executing this step, installed at printing locations.
Using your preferred browser, access the PaperCut system at http://impressao-alunos.fgv.br and authenticate your identity using your FGV Access Account name and password. Then do the following:
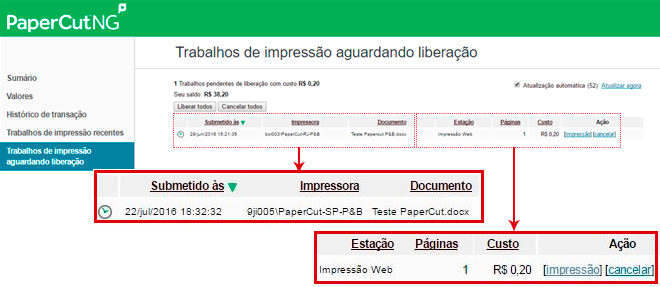
• Select the Print Jobs Waiting for Confirmation option;
-
For each Print Job, as well as the file name, the system will show:
o the number of pages to be printed;
o the cost in R$;
o the Print and Cancel options, which are the two actions you can take; -
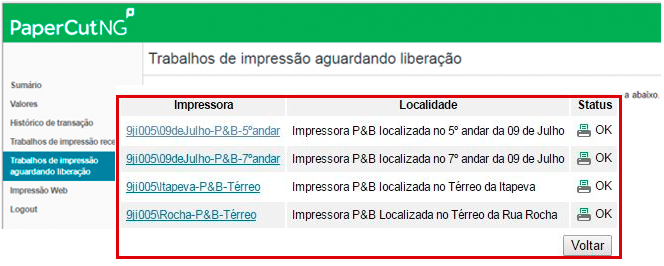
If you select Print, you will have to choose the printer to use. Note that the name of each printer indicates its location, to facilitate the collection of printouts, which will be generated as soon as the operation is completed;
- If you select Cancel, the Print Job will be removed from the queue, and you will not be charged.
Identification of Printers
When executing Step 1, students choose a printer identified by the word PaperCut followed by its location (Sao Paulo, Rio de Janeiro or Federal District) and “COR” (color) or “P&B” (black and white). For example, PaperCut-RJ-COR is a printer located in Rio de Janeiro that prints in colors, while PaperCut-SP-P&B is a printer in Sao Paulo that prints in black and white.
In Step 1, you actually choose a group of printers. When you execute Step 2, you will need to choose a specific printer in the group. Note that the printers’ names indicate their specific location, such as “PraiadeBotafogo-P&B-7º Andar” (Botafogo Beach, black and white, 7th floor).
Observations:
• When you execute Step 2, if you do not have enough credits, PaperCut will generate an alert message and the Print Job will remain in the queue.
• By acquiring enough additional credits, you can repeat the operation and print out your document.
• Print Jobs will be automatically removed from the queues 24 hours after their creation, at no cost.